

If you do the electrical wiring yourself by self-building, there are various wiring patterns and it is fun. In this article, we read about How to wire a light switch? Of course, you need an electrician’s diploma, but it is useful to know it as knowledge (^^) this page will write about how to wire various patterns of switches and how to add outlets. However, those who do not have an electrician’s license cannot do the work, so please use it only as background knowledge.
Wiring for 1 lighting fixture and 1 switch
- First of all, if you draw a “wiring diagram” for simple wiring that has one switch for attaching one lighting fixture, it will look like this
- Since the wiring diagram is drawn with a single line, it is not possible to understand how multiple wires in the cable are connected from this diagram alone.
- So, let’s disassemble it further and draw about how the wires are connected ..
- This is called a double-track diagram.
- To put it roughly, electricity goes through the black wire to a load of lighting equipment, etc., and after working there, it comes back through the white wire. It’s easy to understand.
- Actually, it is different, but it means that it is easy to understand if you imagine it like this for convenience when considering the connection of electric wires.
Wiring of 2 lighting fixtures and 2 switches
- This is the case when each of the A and B lighting fixtures has its own switch.
- Even though there are two switches, you want to put them on one plate instead of installing them separately in separate places.
- So, the wiring diagram looks like this …
- A cable extends from one joint box to lighting A, lighting B, and a switch.
- I want to make a switch like this.
- Two switches fit on one plate.
- By using a 3-core cable for the line to the switch, you can blink two lighting fixtures from one place (^^) v
- There are three plug-in connectors for two wires and one for three wires. is.
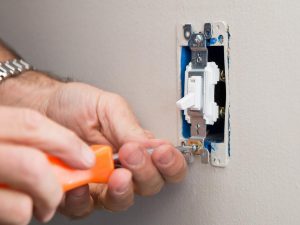
- This is the image on the back of the switch plate.
- The top of the image is the switch for lighting A, and the bottom of the image is the switch for lighting B.
- A white wire is connected to the right side of the A switch, a red wire is connected to the right side of the B switch, and a black wire is connected to the left side of the A switch to wire a light switch. That’s why.
Wiring of 1 lighting fixture and 2 switches
- One luminaire can be blinked from two switches provided at separate locations.
- It is a so-called 3-way switch.
- The wiring diagram looks like this …
- A 3-core cable is used for the line leading to each switch.
- Inside the joint box, as you can see in the image, you need 5 plug-in connectors for 2 wires.
- The backside of the 3-way switch.
- Insert the black line into the hole labeled “0” and insert the white and red lines into the remaining “1” and “3”.
Wiring for 1 lighting fixture and 3 or more switches
- Up to 2 places can be covered with a 3-way switch, but if there are 3 or more places, you can use a 4-way switch.
- With this, in theory, one luminaire can be blinked from any number of places.
- However, the wiring extension will be very long (^^ ゞ
- Since the line leading to the 4-way switch requires 4 wires, a 3-core cable cannot make it in time, and 2 2-core cables are used.
- The joint box is very crowded with 7 2-wire connectors! (smile)
- The backside of the 4-way switch.
- Insert two wires from each of the two cables into the symbols “1”, “3” and “2”, “4”, respectively, for a total of four wires.
- However, as shown in the wiring diagram above, if there is only one joint box, the extension of the cable will belong to wire a light switch, so it may be more common to increase the number of joints. We do that too.
In that case, the wiring diagram looks like this.
Wiring of outlet with switch
- If you have an electrical device with a plug, but you want to turn it on / off with a wall-embedded switch.
- For example, for water pipe heaters in my home. I leave the plug in the outlet and use the switch when necessary.
- The wiring method is exactly the same as for lighting equipment.
- In this way, it is convenient to put a switch on the way even if it is an outlet ~ (^^) v
Wiring multiple outlets
- Unless it is a dedicated circuit that uses equipment that exceeds 1200 watts. Such as a microwave oven, usually multiple outlets are placed in one circuit …
- In the case of an outlet, you can simply branch it, so connect the black wires and the white wires.
Expansion of outlets
- If you want to add an outlet, there is a way to extend the wire from the existing. Outlet without having to branch the wiring from the joint box behind the ceiling.
- However, it is a story after considering the allowable current of the entire circuit.
- This is the hole on the back of the outlet. The remaining hole is “feed”, so if you insert a black and white wire here. You can connect it to another outlet (^^) v
- By the way, the outlet is grounded on the left when viewed from the front. (indoor side) Since it is on the side (= the one with a slightly longer insertion hole). The right side is the ground side when viewed from the back.
- Therefore, insert the white wire into the hole on the right side.
- The letter “W” or “N” is engraved on the ground side so as not to make a mistake.
Also read: how to stop crying


